|
Food products are stored in a cold room
Our new release of ColdRoom for Windows is a big step ahead of existing programs. On the face of it, the program appears simple and this is intentional. Enter the visible fields, press solve and print a report. Behind the scenes, the program gives you the ability to customize all aspects of the cold room design. We will take you through the whole process step by step. When the program starts, you will see the main entry form.
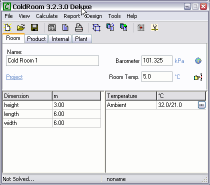
The program remembers your last settings so you may not see exactly the same form. The program has a main menu and a quick access button bar at the top. At the bottom, is a status bar where you see the state of solving and whether the current file has been saved. The main body of the program is a tabbed notebook that allows you the access all the fields in a logical way. The first page is the Room where you select a room type and properties relating to the room. The first field is the room type. This is a pull down selection of all the types that you have created. Later we will discuss how to create a new room. At the time of creating a new room, you define the dimensions. In this case, the dimensions are height, length and width. These dimensions will therefore change, depending on the room type that you select. On the right hand side of the first page are the pressure and temperature fields. Like the room dimensions, the external temperatures that you see will depend on the room you select. In this case, the "Cold Room" has a single ambient temperature surrounding the casing. There are buttons next to the barometer and temperature fields. These are property editors to assist you in entering the correct value. Entering Barometric Pressure.The barometer field is required so that psychrometric calculations of moist air can be calculated correctly. If you know the barometric pressure, enter the number directly. To make it easier, we have provided a World Locations Database where you can select the pressure in terms of altitude or by selecting from an existing location.Of course, you can add your own location to a database. The World Locations database is stored in a file WorldLocations.ini. If you want to further customize this file, see the section on INI files at the end of this tutorial first.
Entering Temperatures.The temperatures seen in the table below the room temperature are moist air conditions that depend on two values to be fully specified. The entry field expects dry bulb and wet bulb temperature separated by a slash "/" (ie. 32/21 to mean 32 °C db and 21 °C wb). There are times when you want to specify properties other than dry bulb and wet bulb. Press the property editor button and you will see the moist air state form. Now, you can enter any two properties and the calculator will solve the moist air state for you. If outside temperature is given as 32 °C with 50% rh, enter these in the moist air state form and press the accept key (the tick). The moist air state form will close and update the temperature field.
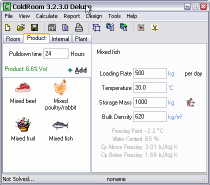
ColdRoom Product Entry.The second page is where you add products to your cold room.
You can now select any product type and press the add button. Once you have selected all the products in the room, you will see an icon for each item. Now, select each item and enter the loading temperature and the loading rate. Normally, you would not mix different types of products in a room but in reality this is your choice. The program does not restrict what you can add.
Internal Heat LoadsThe internal heat loads are straightforward. People, lights and equipment create a load on the plant. You will see that we allow for an additional term not normally seen in a ColdRoom program. This is ventilation. In a typical airconditioning application, there is a minimum fresh air requirement for people working in an enclosed space. This is typically 5 l/s/person. You simply set this rate to zero if it is not required. Lighting can be specified as the actual rating or as an average rate per floor area. The program remembers which one you set last and calculates the other field, if required, if the floor area changes.
Refrigeration PlantThe cooling plant is typically an outside condenser with a blower coil in the room. The blower coil may have defrost heaters with a given rating. If you don't know the element capacity, it can be estimated as a percentage of the total load. The blower fan motor is also a load on the system. We allow you to specify the duty or estimate it as a function of air changes. We assume a pressure drop of 200 Pa, a fan efficiency of 65% and a motor efficiency factor of 1.2. If you use the default air changes, we calculate the motor heat based on a fixed air changes per hour. Finally, the plant duty is calculated from the room load and corrected for running time.
Load Summary
We have made this page as a pull-out form. Grab the tab with the mouse and pull it out of the notebook. Now you can resize it and position it alongside the mainform so that you can see the details as you proceed.
Remember, as with all technical software, you are the designer and are responsible for your own designs. The program will do the recalculations for you but you must look at the bottom line with a critical eye. After solving, look down the list of percentages and pay particular to the highest, the lowest and any zero values. In the loads shown here, I would investigate the wall transmission in more detail since it is too high. I intentionally used a single brick wall to illustrate this here.
DesignersUp to now, you have seen the simple data entry but we have mentioned the ability to create your own systems. This is where the real power of this program is seen. On the main menu database, you will see the box designer and the produce property editor. These will allow you to customize the primary data of the program by designing your own room types and by entering your own produce.
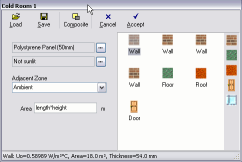
Designing the ColdRoom BoxThis is the box designer that is only available in the deluxe version of the ColdRoom program.
A box can be made from the following components Wall, Floor and Roof. These are all conduction elements. Door and Window. These are conduction elements with the addition of air leakage In this form, you add all the walls that define the box. At each wall select the wall type and solar loading by clicking on the caption. Now, this is where the program gets interesting. Select the temperature on the other side of the "wall". If its not in the list, write a new one. For example, the room may be adjacent to a shop and the Outside temperature will be "Indoor". As you enter "Indoor", it will appear in the temperature list on the first page. Each wall has an area. You can define the dimensions that make up the wall area. In the "Wall 1" above, the area is defined as length x height. As you enter these dimensions, they will appear in the dimensions list on the first page. Keep these dimensions to a minimum to reduce the amount of information required each time you calculate a room. Adding a WallIf the wall type is not in the list, just create your own. Press the create button and the following form appears. A wall is made up of layers. Select a layer from a list of layers, enter the thickness and press the add button to add it to the wall composite. Drag the layers with the row heading to sort from outside to inside. Give it a name and press the write button to add the wall to the list.
Wall LayersWhat do you do if the material layer is not in the list? Just create your own. From the composite designer, press the material button and the material properties will appear in a list. Now you must be careful , since you are working with the fundamentals of the program's database. Many of the Microsoft Windows programs use a file format known as INI. If you look in your Windows folder, you will see some system files with the ini extension. This is a very powerful text file format that has not been given much publicity. There are consequently not many dedicated editors to operate on these types of files. In the ColdRoom program (and many other TechniSolve programs), we have made use of the INI format. To provide our customers with data editing power, we wrote our own INI Editor that we sell as a program in its own right. From ColdRoom, the INI Editor will automatically load the material database. You can now add your own material. The program expects to find certain data : Heat Capacity, Conductivity and Density (SI Units only). Sometimes, these properties do not apply. For example a film resistance is a layer with no density or heat capacity. In this case, you only need to enter the resistance. We have made it easy for you to add all the necessary fields. Select a material that is similar to the one you want to add and press the clone button. This will create a new material with all the fields exactly the same as the selected one. Now, go to each of the properties and edit to suit.
Adding New Products to the databaseFrom the main menu, you can edit the properties of the food products. We have build a database primarily from data published by ASHRAE. This page will allow you to update and enhance the data supplied with your own data. |
 As you press the calculate button, a summary of the loads is updated. If the
loads window is not visible then activate it using the 'Calculate - View Loads'
menu item.
As you press the calculate button, a summary of the loads is updated. If the
loads window is not visible then activate it using the 'Calculate - View Loads'
menu item.